It's been a while since I posted about the new aviary complex that I'm working on to house some of our parrots. I've been hard at it again this past weekend and with the wiring of the frames now completed and painting started I thought I would share a few insights into these two aspects of the construction.
First up, let's talk about attaching weldmesh to the aviary frame. For a novice or someone inexperienced this can end in a really poor looking aviary and an awful lot of frustration. A couple of pointers that might help when you are applying the weldmesh sheets are:
- When placing the weldmesh sheet against the frame, make sure that the `bow' (created by the wire having come from a roll) is directed away from the aviary. Think of it as placing the weldmesh sheet so that it forms a convex arc away from the frame - rather than a concave curve towards the frame.
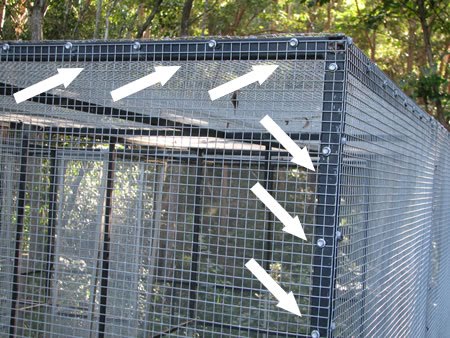
- When drilling in the tech screws, make sure that each screw is placed tightly into the corner of each weldmesh square so that as you work your way out from the corner of the frame, the mesh is being pulled in opposing directions along the lengths of the frame. Drilling the screws in equidistant along the frame lengths will also assist in achieving a more uniform and `tighter' fit.
The ultimate goal is to achieve as tight and flat a weldmesh panel as you can. There's nothing daggier than a `bubbled' or floppy sheet of weldmesh on your aviary so take your tiome to get it right - you'll be looking at the results for years to come ;-) Achieving a `tight' fit is much easier when using 900mm wide sections than 1200mm wide sections, but a good tight and flat fit can be gained across both dimensions if done patiently and with care (two things that are usually lacking in my aviary building by about the third sheet :-() The image below shows the directional fixing of the tech screws - although, note that I have actually fixed the top row coming from the other end, not from the corner shown. If I had started from the corner shown the top row of screws would be working away from the corner - not towards it. Basically you just need to be working against the tension and pull of the opposing frame length.

One of the most common questions I am asked about my aviaries is `What do you paint them with?' It's a good question as most parrot owners are naturally averse to anything that might traditionally be considered `toxic' to their birds. In short, I use water based outdoor paint in low sheen/flat black. I only ever use either Dulux Weathershield or Wattyl Solagard. We've used both of these for 10 years now and it's completely harmless. For tidying up the hard to reach places that aren't easily covered with the paint roller, I use a water based spraypaint - once again in flat black. Water based acrylic spray paint can sometimes be hard to locate and is more expensive but it's the only option. We never use enamel based paints.
The next question about painting that I receive is `Why do you use black?'. The answer is that bare weldmesh sheet is highly reflective of light and hence visibility through the wire is very minimal. Aesthetically, bare wire will also start to show signs of corrosion and discolouration quite quickly due to environmental exposure. To give you an example of the visibility difference between unpainted and painted weldmesh check out the picture below that I took today of two adjacent panels - one painted, the other bare.
Make sure you make an effort to come along to the Parrots 2010 Convention in Brisbane on the first weekend of July. I will be delivering a full presentation there on outdoor enrichment aviary design and construction.